MPTool: Automate Windows Service Monitoring

Monitoring a Windows Service running state is a common request at my work, and therefor a obvious thing to automate and win back some free time. Thanks to the MPTool PowerShell module this can easily done with four lines of PowerShell

First you need a management pack to place it in, either use a existing or create a new. In this example we will place all resources, class, discovery and monitor, in the same management pack, for more complex management packs you will usually split into separate management packs.

New-MPToolManagementPack -ManagementServerFQDN scomms01.cloudmechanic.net `
-ManagementPackName "CM.MyApp.ServiceMonitoring" `
-ManagementPackDisplayName "CM MyApp Service Monitoring" `
-ManagementPackDescription "Contains monitor for MyApp Windows service Monitor" 

Once you have a management pack to place the monitor in, you need a class for the specific Windows service, you don’t need to add any properties for just basic service monitoring since the name of the Windows service cannot exist more than once on a Windows computer.

New-MPToolLocalApplicationClass -ManagementServerFQDN scomms01.cloudmechanic.net `
-ManagementPackName "CM.MyApp.ServiceMonitoring" `
-ClassName "CM.MyApp.WindowsService" `
-ClassDisplayName "CM MyApp Windows Service" `
-ClassDescription "CM MyApp Windows Service - Created with MPTool" 

We now have a class for our Windows service and we can then go ahead and create the discovery to find where the service is existing. All Windows Services has a key under HKLM:SYSTEM\CurrentControlSet\Services\[NameOfTheService] so this can be used to discover the service. Note that this should be the service name and not the display name.

New-MPToolFilteredRegistryDiscovery -ManagementServerFQDN scomms01.cloudmechanic.net `
-ManagementPackName "CM.MyApp.ServiceMonitoring" `
-DiscoveryName "CM.MyApp.WindowsService.Discovery" `
-TargetClassName "Microsoft.Windows.Computer" `
-RegistryPath "SYSTEM\CurrentControlSet\Services\MyApp\" `
-DiscoveryClassName "CM.MyApp.WindowsService" `
-IntervalSeconds 300 

Now the final step is to create a monitor for the discovered instances of the Windows service. Here you simply just need to target the newly created class, select the state of the alert if it triggered, Error or Warning, and last again defined the name of the Windows service to monitor the state of.

New-MPToolWindowsServiceMonitor -ManagementServerFQDN scomms01.cloudmechanic.net `
-ManagementPackName "CM.MyApp.ServiceMonitoring" `
-TargetClassName "CM.MyApp.WindowsService" `
-UnhealthyState "Error" `
-ServiceName "MyApp" 

Of course now we want to put it all together in a script that we can use for self-service scenarios! I have created one example and placed  my GitHub for MPTool.

Happy automating!


Orchestrator PowerShell Template

I recently did a webinar together with Cireson on CMDB, automation and self-service using System Center Service Manager, System Center Orchestrator and the Cireson Portal. In the webinar I showed how i always use only the .NET Script Activity in all our runbooks, and the same PowerShell “Template” to invoke scripts. The reason for only using PowerShell scripts instead of the Orchestrator activities is that you will need to add a lot of activities, which can get quite messy, to achieve the same that you can do with a few lines of PowerShell. Secondly you will also quickly realize that the Orchestrator activities are pretty limited, and finally if you want at some point to move to Azure Automation or SMA then you can quickly just copy and reuse all your scripts.

The template below is made to invoke the scripts on a targeted computer, and collect any errors in the Invoke-Command. When running a script block in Invoke-Command it will not return anything back so that is why the Try, Catch, Finally is there. Also if you want to return some data from your script you can add it in the Finally block to the $return and then split it afterward, below you can see an example on returning output from Get-NetIPAddress.

#Credentials and computer name where you wish to execute your script.
$secpasswd = ConvertTo-SecureString "PASSWORD" -AsPlainText -Force
$Creds = New-Object System.Management.Automation.PSCredential ("USERNAME", $secpasswd)

$Computer = "Server01.domain.local"

$return = Invoke-Command -ComputerName $Computer -credential $Creds  -ScriptBlock {
#Ensures that script will fail on error
$ErrorActionPreference = "Stop"

Try{
#CODE HERE, MUST NOT RETURN ANY OUTPUT, Note: Use "| Out-Null" if cmdlet returns output
#Example
$IPAddress = Get-NetIPAddress
#Example

#If all code succesfully executed then $status will be Success
$Status = "Success"
}

Catch{
#On script failure $Status will be Failed and the error message sent to $ErrorMessage
$ErrorMessage = $_.Exception.Message
$Status = "Failed"
}

Finally{
#Will always return $Status and $ErrorMessage
$return = @($Status, $ErrorMessage, $IPAddress)
$return
}
}
#Get Return values
$Status = $Return.Get(0)
$ErrorMessage = $Return.Get(1)
$IPAddress = $Return.Get(2)

You then need to create a published data for each variable you want to return from the activity. I always put the $Status and $ErrorMessage as published data as minimum to keep some sort of consistency.

runbokpub

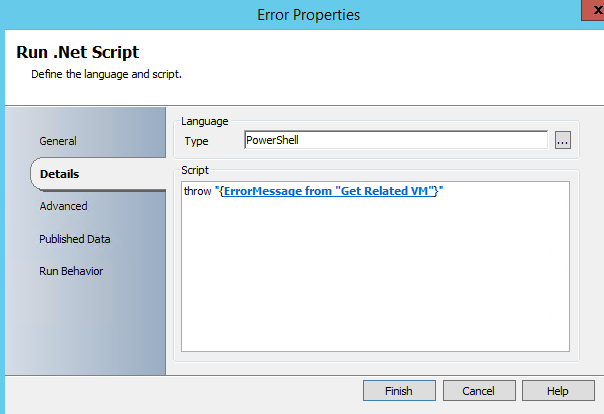
Then make a new Run .Net Script activity below with the code to throw the error message from your script in the runbook.

runbookthrow

And make a link that will be triggered if $Status is not equal Success.

runbooklink

You could also add a invoke runbook after the Error activity if you have a runbook to add something to a error log of some sort, in my case i use the Analyst log in Service Manager.

runbookcomment

Here is the webinar recording