Deploying a SDNv2 lab on a single host using nested Hyper-V

With Windows Server 2016 we got SDNv2 that is the second generation of the Microsoft Software-defined Networking for Hyper-V, if you to know more about SDNv2 check the Microsoft Docs. To make it easier to validate and test SDNv2 Microsoft has created a scripts repo to get you started. The SDNexpress scripts can be used to deploy SDNv2 with or without VMM on four or more Hyper-V hosts in a single rack/cluster/scale unit.

But what if you don’t have four spare servers to test this out? Don’t fear nested Hyper-V is here! With Windows Server 2016 we also got the ability to run multiple Hyper-V hosts nested on a single physical host, this is the perfect tool for labs and testing.

Jaromir Kaspar from Microsoft has created a awesome toolkit to quickly spin up a nested lab with a domain controller, optional with VMM and a bunch of hosts, it also contains a great variety of scenarios to test out different configurations for Windows Software Defined-datacenter and many more.

A few months ago I added my first contribution to this project, a scenario to deploy a full VMM managed SDN fabric using nested Hyper-V on a single server with less than 10 minutes of work effort.
With the latest updates to the SDNExpress scripts from Greg Cusanza I decided also to create a scenario for deploying SDNv2 without VMM.

To get started you need to prepare a few things

  • A Hyper-V Hosts with 100GB of free memory and 300GB disk space
  • A Windows Server 2016 or 2019 ISO
  • Windows Admin Center 1806+

Jaromir already created some good guidance one how to use his toolkit to spin up the initial VMs, just follow step 1 – 7 to spin up the Hyper-V hosts, DC and a management server using the labconfig file content from the SDNScenario.

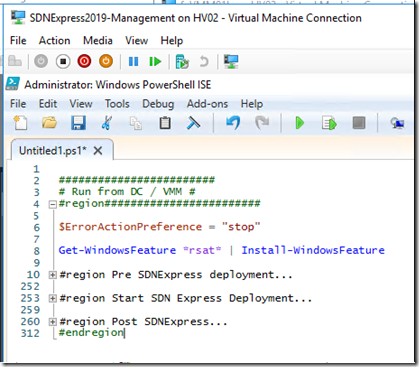
When you have created the DC, the Management VM and the four Hyper-V hosts it is time for my script to do it’s magic! Copy the scenario script into the same folder as the lab scripts and labconfig.ps1 file and and right-click it and select edit to open it in PowerShell ISE, the script is divided into two regions the first part you have to run on the Hyper-V hosts that the lab is deployed on, the second part you have to copy into the Management VM.

image

For the first part of the script that you execute on the Hyper-V host if the script cannot find the VHDx in ParentDisks folder you will be prompted to select a VHDX to use for deploying the SDN components, simply just use the same Core VHDX file as the lab already created to deploy the nested hosts inside the ParentDisks folder. Second you will be prompted to select the MultiNodeConfig.psd1 file that is a part of the scenario repository, this file contains all the information need for the SDNexpress deployment. Finally you are prompted for the Windows Admin Center MSI installer. The script will now start all the VMs for the lab, copy all the files need into the Management VM and install the RSAT tools.
It is then time to login to the Management VM and use the second part of the scenario script.

The second part the scenario is sorted in three regions, the first region is preparing a few accounts and groups for SDN, configuring the hosts for Hyper-V and creates a Storage Spaces Direct cluster.

image

The second region is running the SDNExpress deployment script. This part can be a bit tricky on nested environments as there sometimes is a few timing issues. The first known issue is that sometimes the SDN VMs is not join to the domain, especially the gateway VMs seems to have problems, if this happens use the Hyper-V Manager console on the Management VM to connect to HV1 or HV2 or HV3 and domain join the VMs manually with SCONFIG to corp.contoso.com.
The second known issue is that some times doing deployment the SLB MUXs is timing out on WinRM, if this happens just rerun the SDNExpress deployment script again and it should continue, the SDNExpress script is made to be rerun if any errors occur.
clip_image001[6]
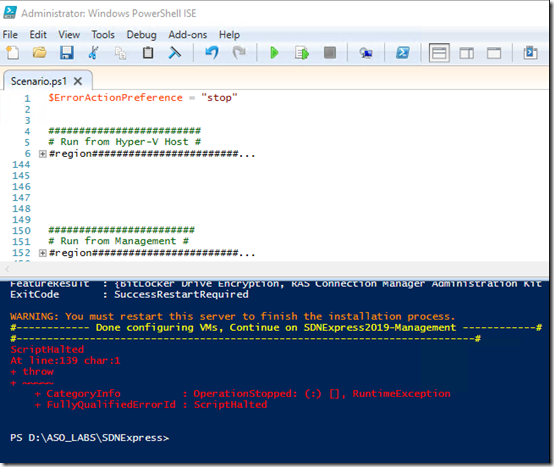
The third known issue is that the Gateways needs to be rebooted after RemoteAccess is installed, if this happens use the Hyper-V Manager console on the Management VM to connect to HV1 or HV2 and restart the related Contoso-GW VM, then rerun the SDNExpress deployment script.
clip_image001

The last region is configuring the BGP peering on the router (DC) and installs Windows Admin Center and Google Chrome on the Management VM.

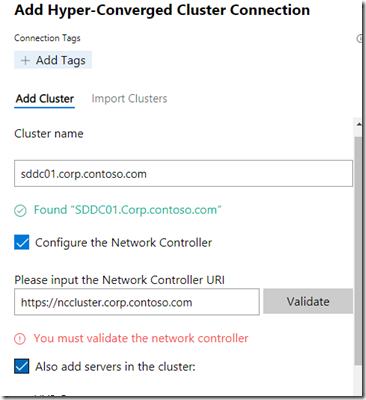
When the script is completed successfully open Google Chrome on the Management VM and go to https://localhost:9999/ to open Windows Admin Center. Click on Add and select Hyper-Converged Cluster and enter the cluster name and network controller URL as shown below.

image

Click on the validate button to validate the network controller connection, if prompted click on Install RSAT-NetworkController and validate again, and then add the cluster

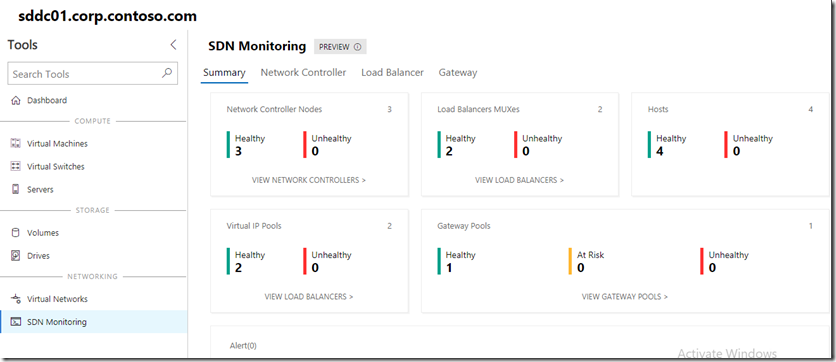
Click on the hyper-converged cluster sddc01.corp.contoso.com and you should now see the cluster dashboard, go to SDN Monitoring to check the health of your SDN environment, if not already connected to the network controller enter the name of one of the controllers to continue and you should now see a health and happy SDN environment ready to play.

image

If everything is green and health you can now start building virtual networks and VMs, provision a gateway for the virtual network and many other things. More on this later…

Continuous Delivery WebApps with ARM Templates, Part 2

Previous: Continuous Delivery WebApps with ARM Templates, Part 1

So it has been some busy months and therefor a bit delayed with this second post, but now I finally got a moment to finish it, so here we go!

In the previous post we created and tested the continuous delivery pipeline for the Azure resources using a ARM template, and with the pipeline for deploying the Azure resources we are now ready to create the pipeline to deploy the application.

image

First you should go and grab the latest version of the ARM template and the Build and Release definition files from my GitHub repo here https://github.com/AndreasSobczyk/Continuous-Delivery-WebApps-Demo, and add them to the ARM template repo in your VSTS project.
Once you have the latest version in your repo you should trigger a build and release of the Azure resource using the pipeline created in the previous blog post.

Now we can start the pipeline creation for the application.
In VSTS go to Build and Release and select Builds, click the import button the top-right and browse to the local copy of the folder, and import DotNetAppSqlDb_App – CI.json, this will import the build definition for the application.
In the build definition on Process select  Hosted VS2017 for agent queue, go to Get sources and ensure that the selected repository is the one that contains the application and not the template. That is it for the build definition.
Like in the previous post, if you want to enable Continuous Integration for the application build go to the Triggers tab and enable it.
When done with everything save & queue the build definition, this will trigger a build of the application to validate the build definition is working and the application code is valid.

image

Now that the application build is done it is time to deploy it to Azure with the release pipeline.
Go to releases and import the release definition by clicking the + on the top-left corner and select Import release definition, browse to the BuildAndRelease Files and import the file DotNetAppSqlDb_App– CD.json.

clip_image001

The import should now give a release pipeline looking like the picture below. As this is only the shell of the pipeline we need to add in some information, I have again added some numbers to easier identify where to click.
First we need to add the artifact to deploy, click the box +Add artifact at 1 and select the build definition for the application (DotNetAppSqlDb_App – CI) previously created, ensure Default version is set to Latest.

image

Next click the lightning at 2. and ensure that After Release is selected to trigger the deploy to Dev when release is started, again you can also add Pre-deployment approvers if you want someone to review the deployment first.
Now click the 1 phase 3 tasks at 3. to configure the Dev deployment. Select Run on Agent phase and set Agent Queue to Hosted VS2017.
Go to Deploy Azure App Service and select the same Azure Subscription as in the release definition for the ARM template, enter the App Service name and Resource Group for the development environment, if you use same parameters as I do it should be DotNetAppSqlDb-dev for both fields, also enter the Deployment Slot name, default is Staging.

image
Next go to the step PowerShell: Test URL, this step contains a PowerShell Script that will validate that the newly deployed code is responding to with HTTP code 200, no additional configuration is needed.
Last in the Dev deployment is the step Swap slot to Dev, again select the same Azure subscription as in the release definition for the ARM template, and enter the App Service name and Resource Group for the development environment. For the source slot select Staging again.
This will swap the staging slot with the development production slot.
The Dev deployment is now configured and we can go to the User Acceptance Testing deployment,  to switch to the UAT deployment click on Tasks in the top menu and select UAT

image

Also for the UAT slot, select Agent phase and set Agent Queue to Hosted VS2017.
Go to the step Deploy Azure App Service and select the same Azure Subscription as before, but enter the App Service name and Resource Group for the production environment, this would be DotNetAppSqlDb-prd if you use the same as I do, for the Slot select UAT.
Again there is a PowerShell step for validating response from the application after deployment.

Now is only left to configure the Production Deployment, click on Tasks in the top menu and select Production.
Again select Run on Agent phase and set Agent Queue to Hosted VS2017.
Select the step Swap slot to Prd and again select the same Azure Subscription as before, but enter the App Service name and Resource Group for the production environment, for the Source Slot enter the name for the previously select deployment slot UAT.

Everything for the release pipeline is now configured and you can click Save, and then release to trigger a deployment.

Again if you want to enable Continuous deployment to trigger the release automatically after each build you can click the lighting at the artifact and click Enabled, if you enable CD you can trigger the build instead and that will trigger the release when done.

clip_image001[3]

With that we now have the entire build and deploy cycle automated in VSTS!
If both CI and CD is enabled you will now trigger a new build and release every time new code is committed to the repositories.
With everything defined in code you can now also easily roll back to a previous version, deploy more instances or to new regions.

Next up will be using this same pattern to deploy to Azure Stack, but more on that next year.

Continuous Delivery WebApps with ARM Templates, Part 1

The boss words these days is all about DevOps, Everything as Code, Continuous Delivery, but how do you actually do it? And why should you do it? Hopefully this post will help you getting started, and by the end of the post provide you with a complete working scenario. So lets get started!

First let me describe the scenario. This case will deploy a simple To-do List .NET WebApp using a Azure SQL Database and monitored with Application Insight.

All code needed for this is provided doing the article, so don’t worry you don’t need to know anything about .NET to test it.

To get that working we need to deploy the following Azure resources, a Azure SQL Server with a database, a AppService Plan with AppService including a Deployment Slot and Connection String, we also want the AppService to automatically scale according to load and to send email alerts for some common errors. Finally we want to deploy a Application Insight instance to monitor it all. And then we want to duplicate it all to separate Development and Production, but hey.. That shouldn’t take long to duplicate since we are using templates right?

clip_image001

We want to use Visual Studio Online build and release management to control the entire deployment of both the Azure resource and the web application in two fully automated flows from code commit to production. This will include some simple automated tests and some manual approvals for going between deployment stages.

image

In this first post I will show you how to create the pipeline for the Azure Resources.

The first thing we need to do is to create a Visual Studio Online Project to store and manage our solution in. Go to the Azure portal (https://portal.azure.com) and provision a resource of the type Team Project, like you create any other resources in Azure. If you don’t already have a Visual Studio Online account it will ask you to create one, in Version Control select GIT and leave the rest default. Currently the VSTS providers in Azure is in preview and you might see that it will load forever, try to just go to the URL of your newly created account directly instead and you will see it is working.

clip_image002

Once you have created the VSTS project you will need to create two repositories within the project, one for the ARM template you are using to deploy the Azure resources, and one for the actual web application code. The reason for splitting the ARM template and the application code in two separate repositories is that in the most cases I see two different persons working on each of the components. A developer team is coding the application and then a cloud engineer or DevOps engineer is creating the ARM template need to provision the Azure resource right. Also it will make it possible to differentiate permissions and branch policies.

clip_image003

When the repositories are created it is time to add some code into them. The application we are using in this case is a sample from Microsoft, they are providing a lot of sample applications for all sorts of things so this is a good place to go if you need some inspiration or just some for testing. https://github.com/Azure-Samples/dotnet-sqldb-tutorial.

For the ARM template I have already created one to deploy the Azure resources I described in the start, you can go and grab it here https://github.com/AndreasSobczyk/Continuous-Delivery-WebApps-Demo.

To add the files to the repositories, you can use a Git client like Visual Studio Code to push the files into the it. See Visual Studio Online + VSCode = Easy PowerShell Source Control for how to.

With all the source code we want to deploy for the solution in place we can now start to create the build and release pipeline. The definitions files for the build and release pipeline is placed in the folder ‘BuildAndRelease Files’ in the same project as the ARM templates.
In VSTS go to Build and Release and select Builds, click the import button the top-right and browse to the local copy of the folder, and import DotNetAppSqlDb_Template – CI.json, this will import the build definition for the ARM template.
On the build definition select Process and select  Hosted VS2017 for agent queue, go to Get Sources and ensure the selected repository is the one for the ARM template. Next select the Validate Template step, select the Azure Subscription to deploy to (you maybe need to authorize VSTS to the subscription), enter a name for the resource group or select a existing (if not existing it will create one), you should use the same resource group for the build as you use for the Dev environemtn, and select a location.
If you want to enable Continuous Integration go to the Triggers tab and enable it. When done with everything save & queue the build definition, this will trigger a build of the ARM template to validate everything is working.

image

With the ARM template build done we can create the release definition to deploy it, go to Build and Release and select Releases. If you have no release definitions yet you have to create new empty one to be able to import, just click the + New definition, select empty process, and save it. You can now go back to Releases and import the definition by clicking the + on the top-left corner and select Import release definition, browse to the BuildAndRelease Files and import the file DotNetAppSqlDb_Template – CD.json.

image

This should import a release pipeline looking like the picture below. As this is only the shell of the pipeline we need to add in some information, I have added some numbers to easier identify where to click.
First we need to Add the artifact to deploy, click the box to and select the build definition previously created, ensure Default version is set to Latest.

image

Next click the lightning at 2. and select After release to trigger the deploy to Dev when release is started, you can also add Pre-deployment approvers if you want someone to review the deployment first.
Now click the 1 phase 1 task at 3. to configure the Dev deployment. Select Agent phase and set Agent Queue to Hosted VS2017. Go to Azure Deployment: DotNetAppSqlDb-tst and select the same Azure Subscription, Resource Group and Location as in the Build definition.
The Dev deployment is now configured and we can go to the Production deployment,  to switch to the production deployment click on Tasks in the top menu and select Production

image

Also for the Production slot, select Agent phase and set Agent Queue to Hosted VS2017. Go to Azure Deployment: DotNetAppSqlDb-prd and select the same Azure Subscription and Location, but enter a different Resource Group for the production workloads, I use DotNetAppSqlDb-dev for dev and DotNetAppSqlDb-prd for production.
Everything for the release pipeline is now configured and you can click Save, and then release to trigger a deployment. If you want to enable Continuous deployment to trigger the release automatically after each build you can click the lighting at the artifact and click Enabled, if you enable CD you can trigger the build instead and that will trigger the release when done.

image

When the release has finished deploying both environment, go into your Azure subscription and verify you have two have two resource groups looking like this.

imageimage

For testing if you want to save some money you can delete both resource groups and redeploy everything at anytime by triggering the build and release.

That is it for now! Next time we are going to create the build and release pipeline for the actual application.